
我们提供安全,免费的手游软件下载!
 小丸子漫画 最新版
  起点读书 官网版
  画涯 无删减版
  飞鸟听书 去广告纯净版
  西西漫画 免费漫画首页
  蓝猫动漫 免广告最新版
  扑漫漫画 免费版
  新新漫画 官网入口
  熬夜看书 手机版
  小丸子漫画 无广告版
v-bind指令想必大家都不陌生,并且都知道他支持各种写法,比如
关注公众号:【前端欧阳】,给自己一个进阶vue的机会
还是老套路,我们来写个demo。代码如下:
上面的代码很简单,使用三种写法将title变量绑定到div标签的title属性上。
我们从浏览器中来看看编译后的代码,如下:
从上面的render函数中可以看到三种写法生成的props对象都是一样的:
再来看看浏览器渲染后的样子,如下图:
从上图中可以看到三个div标签上面都有title属性,并且属性值都是一样的。
在之前的
面试官:来说说vue3是怎么处理内置的v-for、v-model等指令?
文章中我们讲过了在编译阶段会执行一堆transform转换函数,用于处理vue内置的v-for等指令。而v-bind指令就是在这一堆transform转换函数中的
还是一样的套路启动一个debug终端。这里以
给
在
我们先来看看第一个参数
从上图中可以看到此时的node节点对应的就是
我们接着来看
第一部分为调用
第二部分为根据当前node节点
从
将断点走进
由于我们在调用
从上图中可以看到props数组中只有一项,props中的name字段为
并且由于我们当前node节点是第一个div标签:
我们接着来看上面for循环遍历props的代码:
从上图中可以看到
我们这里name的值为
接着就是执行
由于node节点中有多个props,在for循环遍历props数组时,会将经过transform转换函数处理后拿到的props数组全部push到
node节点上的props属性本身也是一种node节点,所以最后就是执行
其中
上面的代码很简单,
我们在debug终端来看看最终生成的props对象
从上图中可以看到此时
到这里v-bind指令已经被完全解析了,生成的props对象中有
接下来我们继续来看看处理
将断点走进
我们先来看看
在debug终端来看看三种写法的
第一种写法:
从上图中可以看到
第二种写法:
从上图中可以看到第二种写法的
可能有的小伙伴有疑问了,这里的
答案是在parse阶段将html编译成AST抽象语法树阶段时遇到
第三种写法:
第三种写法也是缩写模式,并且将属性值也一起给省略了。所以这里的
我们再来看
这里的
从前面的那几张dir变量的图我们知道
经过这一步处理后
还记得前面两种模式的
所以需要执行
我们来看
这里的
经过
其实
在transform阶段处理vue内置的v-for、v-model等指令时会去执行一堆transform转换函数,其中有个
在for循环遍历node节点的所有props时,每次都会执行
在
关注公众号:【前端欧阳】,给自己一个进阶vue的机会
热门资讯
、
、
(vue3.4中引入的新的写法)。这三种写法的作用都是一样的,将
title
变量绑定到div标签的title属性上。本文将通过debug源码的方式带你搞清楚,v-bind指令是如何实现这么多种方式将
title
变量绑定到div标签的title属性上的。注:本文中使用的vue版本为
3.4.19
。
看个demo
Hello Word
Hello Word
Hello Word
const _sfc_main = _defineComponent({
__name: "index",
setup(__props, { expose: __expose }) {
// ...省略
}
});
function _sfc_render(_ctx, _cache, $props, $setup, $data, $options) {
return _openBlock(), _createElementBlock(
_Fragment,
null,
[
_createElementVNode("div", { title: $setup.title }, "Hello Word", 8, _hoisted_1),
_createElementVNode("div", { title: $setup.title }, "Hello Word", 8, _hoisted_2),
_createElementVNode("div", { title: $setup.title }, "Hello Word", 8, _hoisted_3)
],
64
/* STABLE_FRAGMENT */
);
}
_sfc_main.render = _sfc_render;
export default _sfc_main;
{ title: $setup.title }
。props属性的key为
title
,值为
$setup.title
变量。

transformElement
函数
transformElement
函数中处理的。
vscode
举例,打开终端然后点击终端中的
+
号旁边的下拉箭头,在下拉中点击
Javascript Debug Terminal
就可以启动一个
debug
终端。

transformElement
函数打个断点,
transformElement
函数的代码位置在:
node_modules/@vue/compiler-core/dist/compiler-core.cjs.js
。
debug
终端上面执行
yarn dev
后在浏览器中打开对应的页面,比如:
http://localhost:5173/
。此时断点就会走到
transformElement
函数中,在我们这个场景中简化后的
transformElement
函数代码如下:
const transformElement = (node, context) => {
return function postTransformElement() {
let vnodeProps;
const propsBuildResult = buildProps(
node,
context,
undefined,
isComponent,
isDynamicComponent
);
vnodeProps = propsBuildResult.props;
node.codegenNode = createVNodeCall(
context,
vnodeTag,
vnodeProps,
vnodeChildren
// ...省略
);
};
};
node
,如下图:
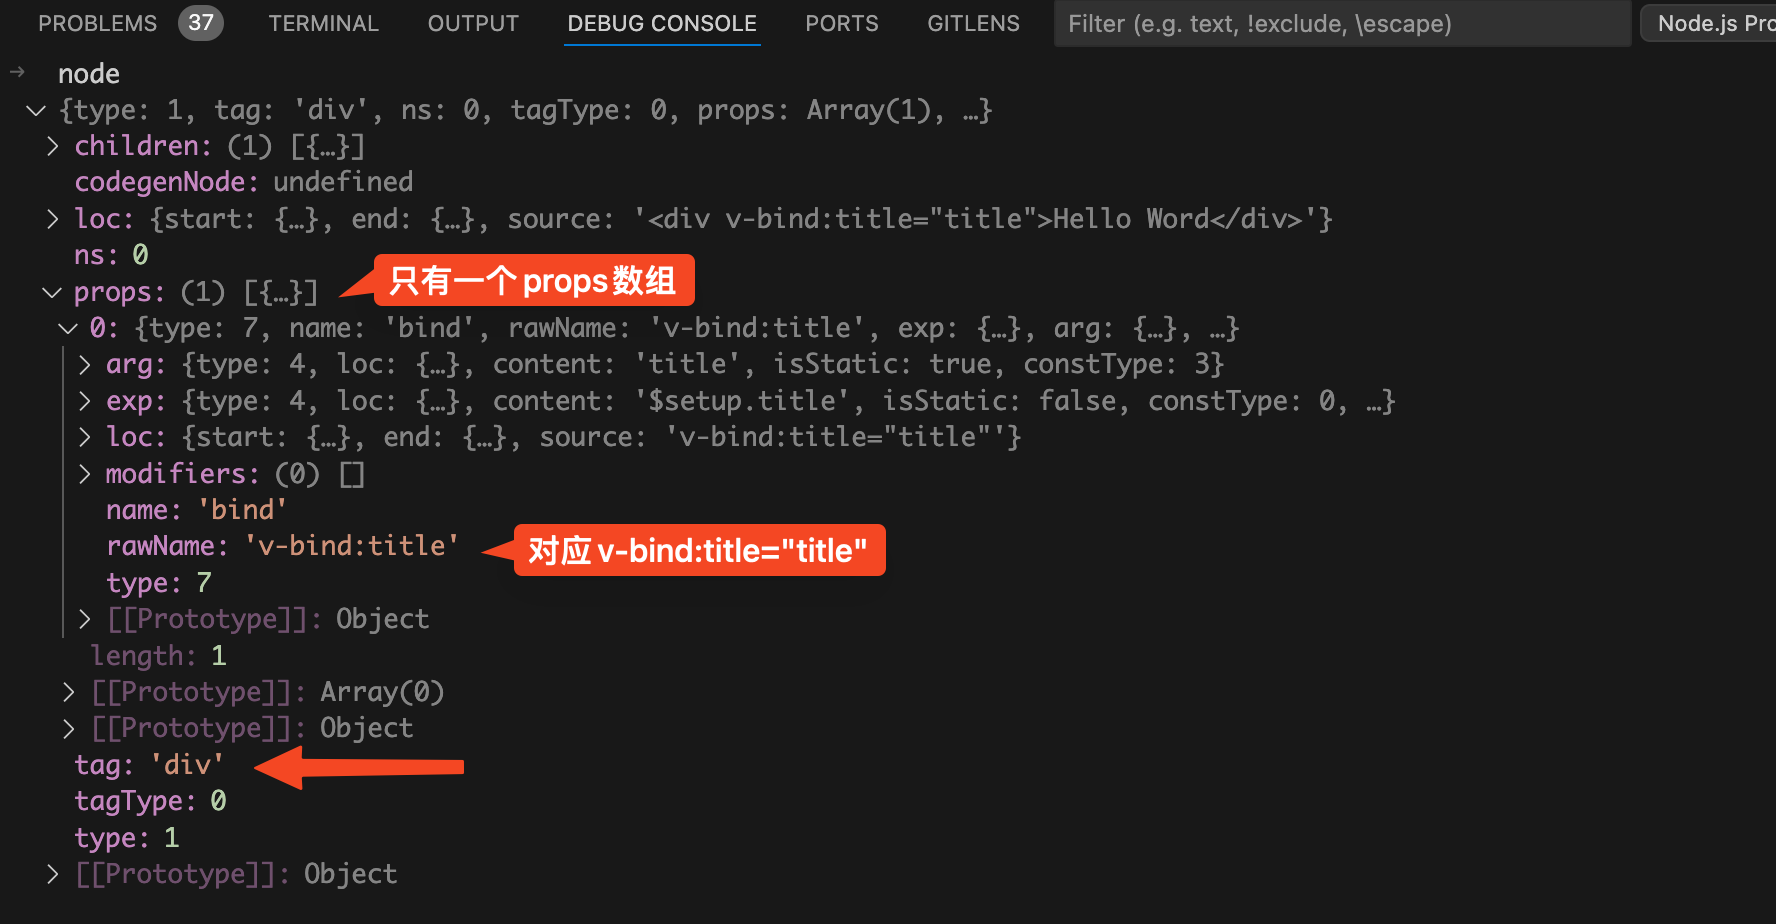
节点,其中的props数组中只有一项,对应的就是div标签中的
Hello Word
v-bind:title="title"
部分。
transformElement
函数中的代码,可以分为两部分。
buildProps
函数拿到当前node节点的props属性赋值给
vnodeProps
变量。
vnodeTag
也就是节点的标签比如div、
vnodeProps
也就是节点的props属性对象、
vnodeChildren
也就是节点的children子节点、还有一些其他信息生成
codegenNode
属性。在之前的
终于搞懂了!原来 Vue 3 的 generate 是这样生成 render 函数的
文章中我们已经讲过了编译阶段最终生成render函数就是读取每个node节点的
codegenNode
属性然后进行字符串拼接。
buildProps
函数的名字我们不难猜出他的作用就是生成node节点的props属性对象,所以我们接下来需要将目光聚焦到
buildProps
函数中,看看是如何生成props对象的。
buildProps
函数
buildProps
函数,在我们这个场景中简化后的代码如下:
function buildProps(node, context, props = node.props) {
let propsExpression;
let properties = [];
for (let i = 0; i < props.length; i++) {
const prop = props[i];
const { name } = prop;
const directiveTransform = context.directiveTransforms[name];
if (directiveTransform) {
const { props } = directiveTransform(prop, node, context);
properties.push(...props);
}
}
propsExpression = createObjectExpression(
dedupeProperties(properties),
elementLoc
);
return {
props: propsExpression,
// ...省略
};
}
buildProps
函数时传的第三个参数为undefined,所以这里的props就是默认值
node.props
。如下图:
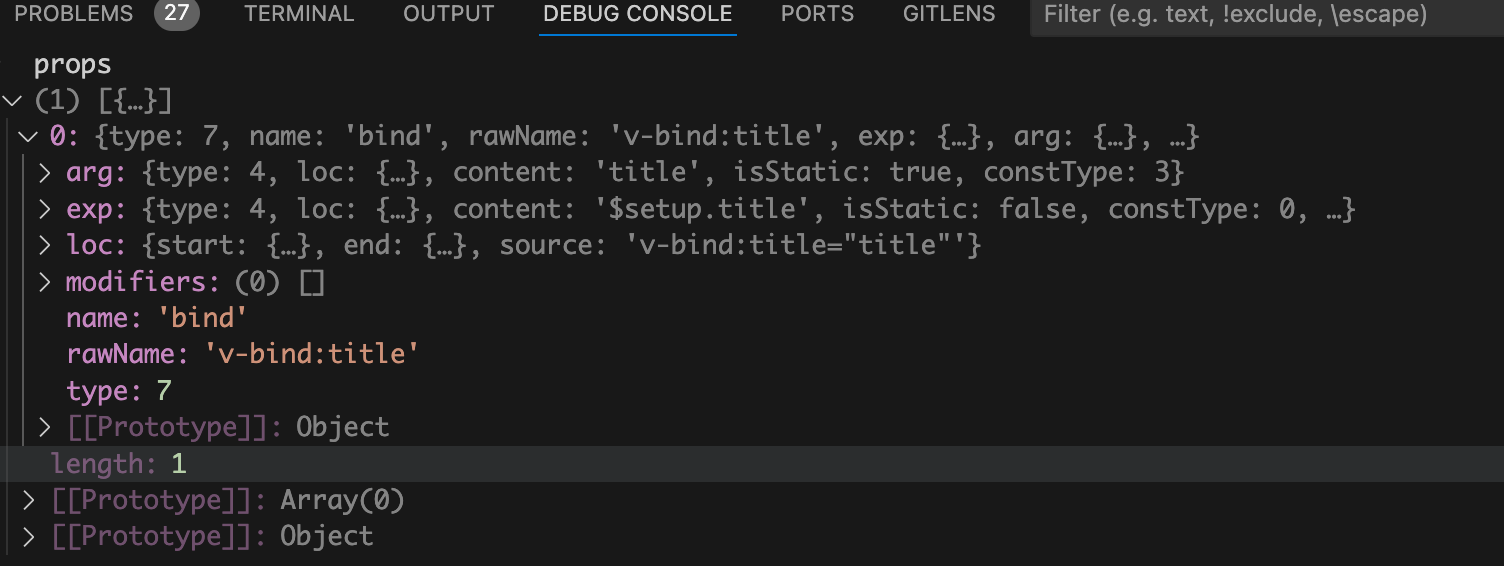
bind
,说明v-bind指令还未被处理掉。
,所以props中的
rawName
的值是
v-bind:title
。
const directiveTransform = context.directiveTransforms[name]
,现在我们已经知道了这里的name为
bind
。那么这里的
context.directiveTransforms
对象又是什么东西呢?我们在debug终端来看看
context.directiveTransforms
,如下图:
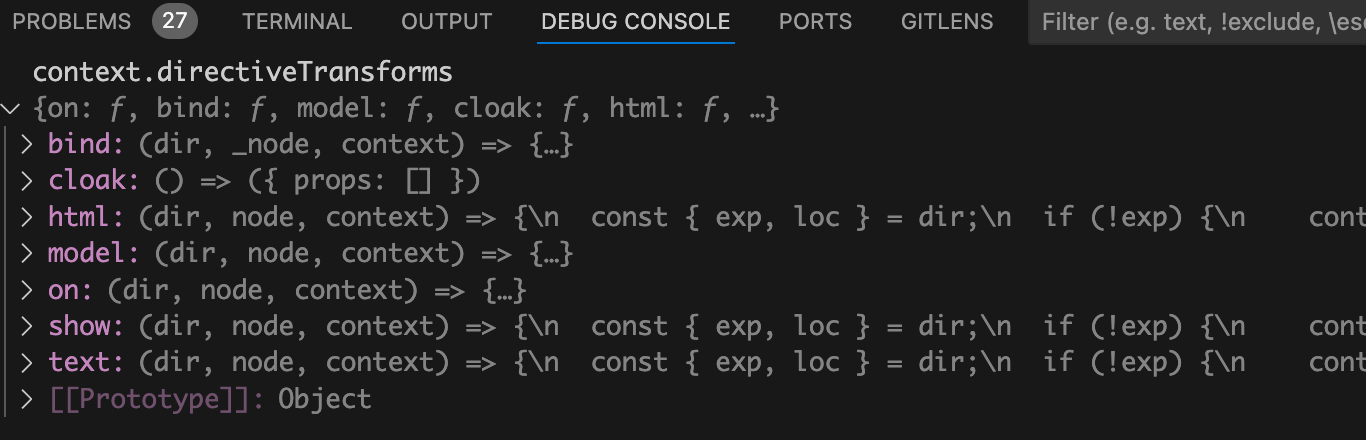
context.directiveTransforms
对象中包含许多指令的转换函数,比如
v-bind
、
v-cloak
、
v-html
、
v-model
等。
bind
,并且
context.directiveTransforms
对象中有name为
bind
的转换函数。所以
const directiveTransform = context.directiveTransforms[name]
就是拿到处理v-bind指令的转换函数,然后赋值给本地的
directiveTransform
函数。
directiveTransform
转换函数,拿到v-bind指令生成的props数组。然后执行
properties.push(...props)
方法将所有的props数组都收集到
properties
数组中。
properties
数组中。
properties
数组中可能会有重复的prop,所以需要执行
dedupeProperties(properties)
函数对props属性进行去重。
createObjectExpression
函数生成props属性的node节点,代码如下:
propsExpression = createObjectExpression(
dedupeProperties(properties),
elementLoc
)
createObjectExpression
函数的代码也很简单,代码如下:
function createObjectExpression(properties, loc) {
return {
type: NodeTypes.JS_OBJECT_EXPRESSION,
loc,
properties,
};
}
properties
数组就是node节点上的props数组,根据
properties
数组生成props属性对应的node节点。
propsExpression
是什么样的,如下图:
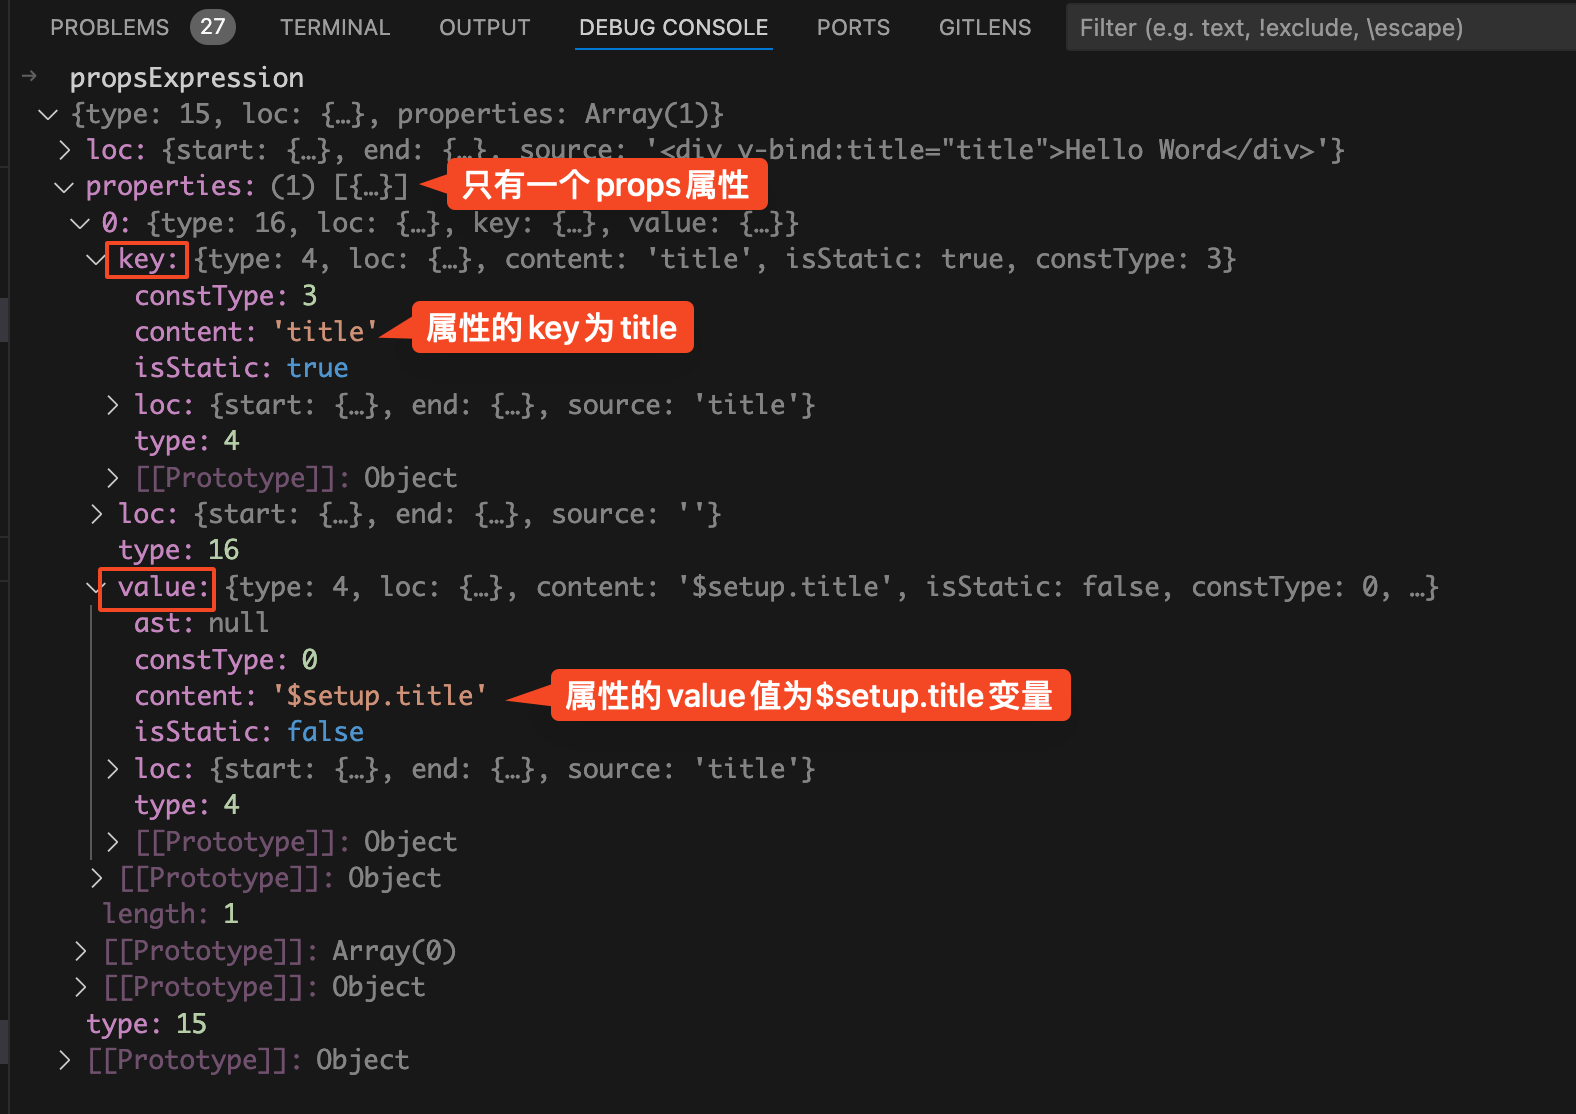
properties
属性数组中已经没有了v-bind指令了,取而代之的是
key
和
value
属性。
key.content
的值为
title
,说明属性名为
title
。
value.content
的值为
$setup.title
,说明属性值为变量
$setup.title
。
key
和
value
字段,分别代表的是属性名和属性值。后续生成render函数时只需要遍历所有的props,根据
key
和
value
字段进行字符串拼接就可以给div标签生成title属性了。
v-bind
指令的transform转换函数具体是如何处理的。
transformBind
函数
transformBind
函数,在我们这个场景中简化后的代码如下:
const transformBind = (dir, _node) => {
const arg = dir.arg;
let { exp } = dir;
if (!exp) {
const propName = camelize(arg.content);
exp = dir.exp = createSimpleExpression(propName, false, arg.loc);
exp = dir.exp = processExpression(exp, context);
}
return {
props: [createObjectProperty(arg, exp)],
};
};
transformBind
函数接收的第一个参数
dir
,从这个名字我想你应该已经猜到了他里面存储的是指令相关的信息。
dir
参数有什么不同。
的
dir
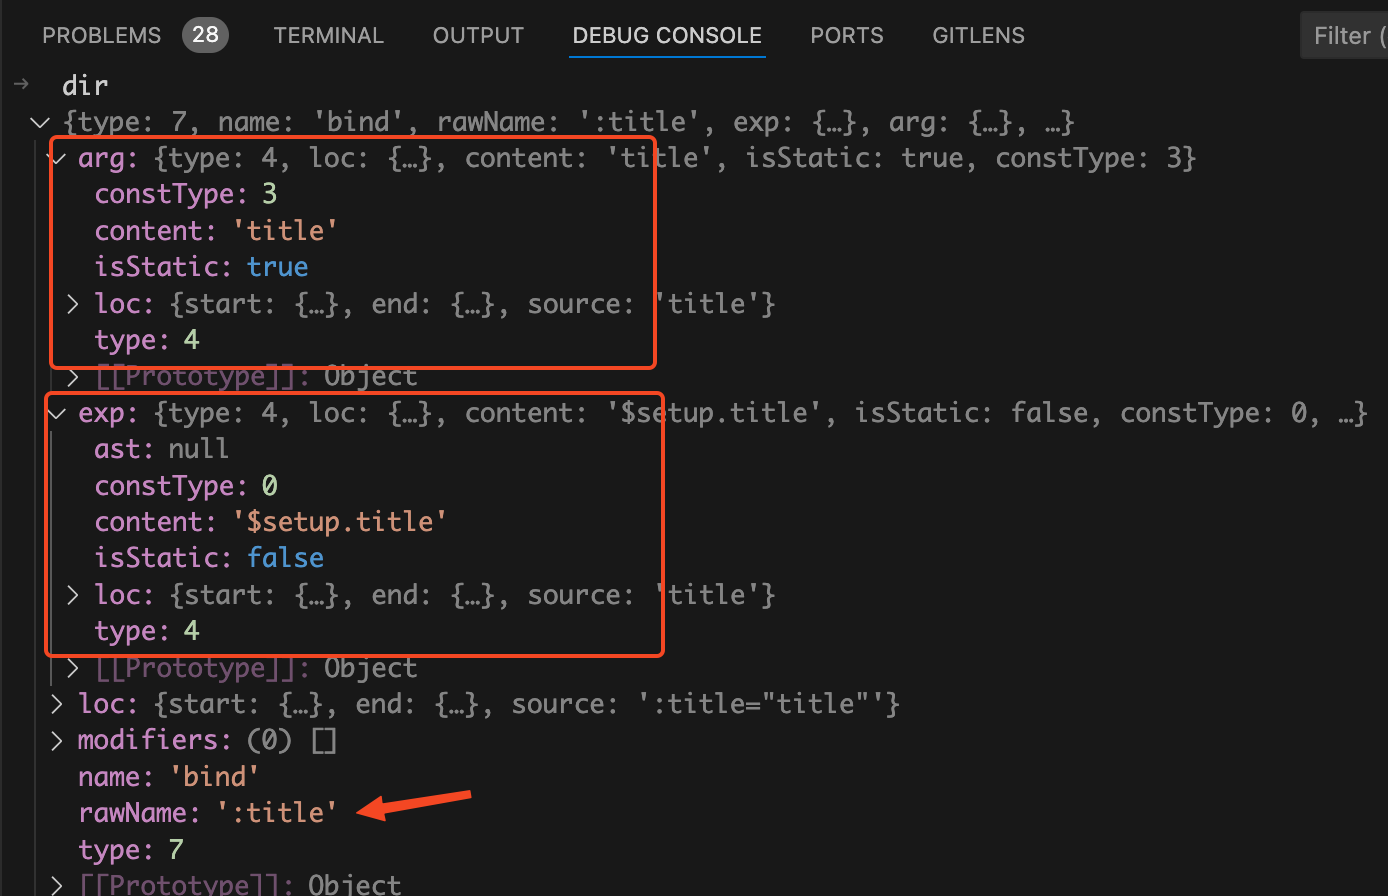
如下图:

dir.name
的值为
bind
,说明这个是
v-bind
指令。
dir.rawName
的值为
v-bind:title
说明没有使用缩写模式。
dir.arg
表示bind绑定的属性名称,这里绑定的是title属性。
dir.exp
表示bind绑定的属性值,这里绑定的是
$setup.title
变量。
的
dir
如下图:
dir
和第一种写法的
dir
只有一项不一样,那就是
dir.rawName
。在第二种写法中
dir.rawName
的值为
:title
,说明我们这里是采用了缩写模式。
dir
是怎么来的?vue是怎么区分第一种全写模式和第二种缩写模式呢?
v-bind:title
和
:title
时都会将其当做v-bind指令处理,并且将解析处理的指令绑定的属性名塞到
dir.arg
中,将属性值塞到
dir.exp
中。
的
dir
如下图:
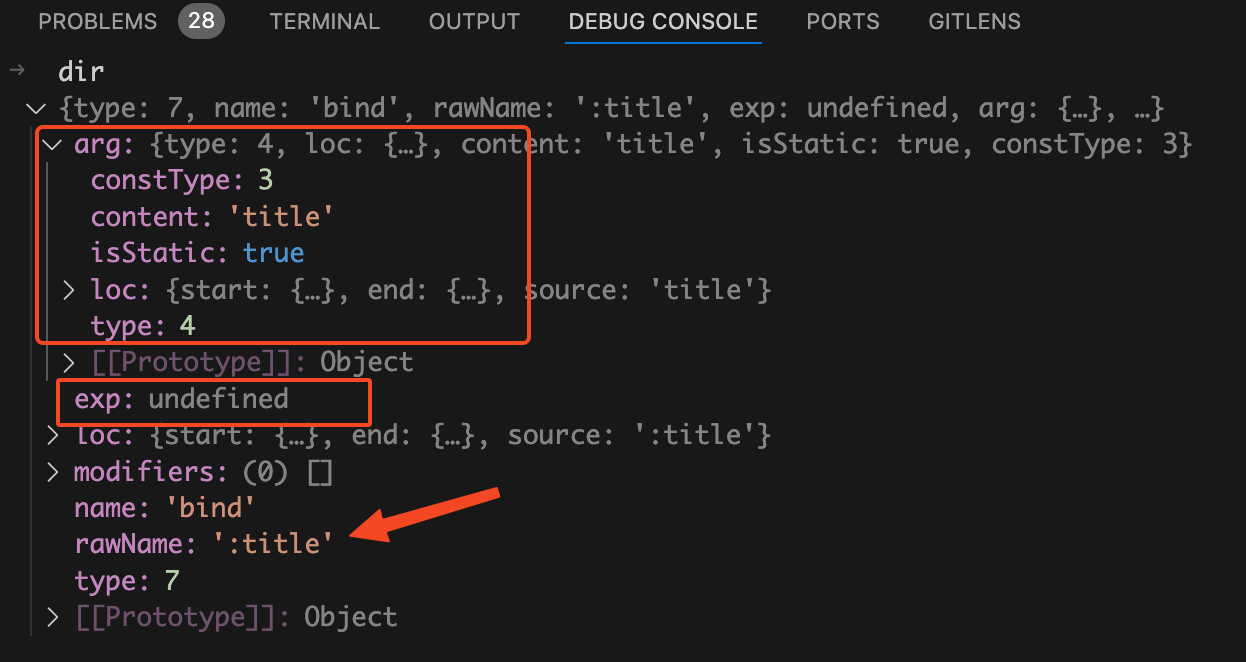
dir.exp
存储的属性值为undefined。其他的和第二种缩写模式基本一样。
transformBind
中的代码,
if (!exp)
说明将值也一起省略了,是第三种写法。就会执行如下代码:
if (!exp) {
const propName = camelize(arg.content);
exp = dir.exp = createSimpleExpression(propName, false, arg.loc);
exp = dir.exp = processExpression(exp, context);
}
arg.content
就是属性名
title
,执行
camelize
函数将其从kebab-case命名法转换为驼峰命名法。比如我们给div上面绑一个自定义属性
data-type
,采用第三种缩写模式就是这样的:
。大家都知道变量名称是不能带短横线的,所以这里的要执行
camelize
函数将其转换为驼峰命名法:改为绑定
dataType
变量。
dir.exp
变量的值是一个对象,所以这里需要执行
createSimpleExpression
函数将省略的变量值也补全。
createSimpleExpression
的函数代码如下:
function createSimpleExpression(
content,
isStatic,
loc,
constType
): SimpleExpressionNode {
return {
type: NodeTypes.SIMPLE_EXPRESSION,
loc,
content,
isStatic,
constType: isStatic ? ConstantTypes.CAN_STRINGIFY : constType,
};
}
dir.exp
变量的值如下图:
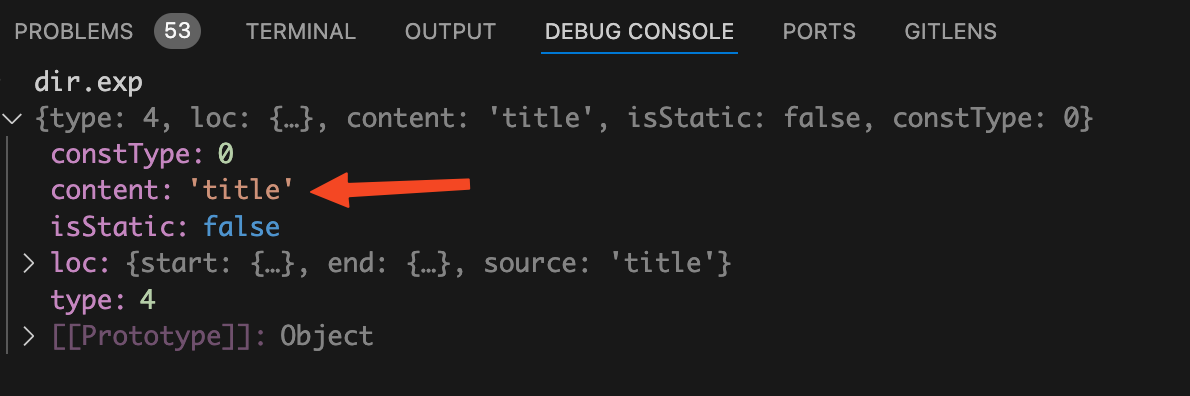
dir.exp.content
的值吗?他的值是
$setup.title
,表示属性值为
setup
中定义的
title
变量。而我们这里的
dir.exp.content
的值为
title
变量,很明显是不对的。
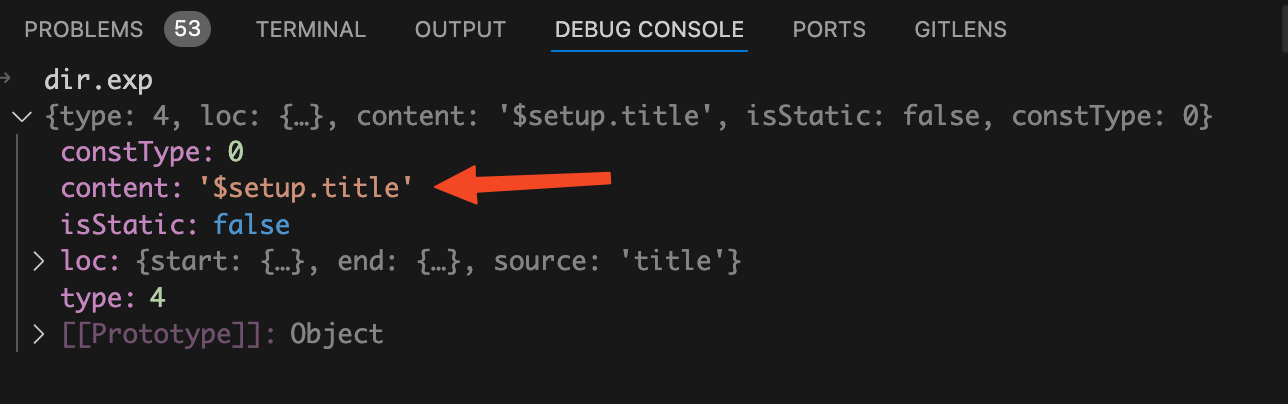
exp = dir.exp = processExpression(exp, context)
将
dir.exp.content
中的值替换为
$setup.title
,执行
processExpression
函数后的
dir.exp
变量的值如下图:
transformBind
函数中的最后一块return的代码:
return {
props: [createObjectProperty(arg, exp)],
}
arg
就是v-bind绑定的属性名,
exp
就是v-bind绑定的属性值。
createObjectProperty
函数代码如下:
function createObjectProperty(key, value) {
return {
type: NodeTypes.JS_PROPERTY,
loc: locStub,
key: isString(key) ? createSimpleExpression(key, true) : key,
value,
};
}
createObjectProperty
函数的处理就会生成包含
key
、
value
属性的对象。
key
中存的是绑定的属性名,
value
中存的是绑定的属性值。
transformBind
函数中做的事情很简单,解析出v-bind指令绑定的属性名称和属性值。如果发现v-bind指令没有绑定值,那么就说明当前v-bind将值也给省略掉了,绑定的属性和属性值同名才能这样写。然后根据属性名和属性值生成一个包含
key
、
value
键的props对象。后续生成render函数时只需要遍历所有的props,根据
key
和
value
字段进行字符串拼接就可以给div标签生成title属性了。
总结
transformElement
转换函数中会去执行
buildProps
函数。
buildProps
函数会去遍历当前node节点的所有props数组,此时的props中还是存的是v-bind指令,每个prop中存的是v-bind指令绑定的属性名和属性值。
transformBind
转换函数。如果我们在写v-bind时将值也给省略了,此时v-bind指令绑定的属性值就是undefined。这时就需要将省略的属性值补回来,补回来的属性值的变量名称和属性名是一样的。
transformBind
转换函数的最后会根据属性名和属性值生成一个包含
key
、
value
键的props对象。
key
对应的就是属性名,
value
对应的就是属性值。后续生成render函数时只需要遍历所有的props,根据
key
和
value
字段进行字符串拼接就可以给div标签生成title属性了。